
Reduce returns and protect your brand with a comprehensive pre-shipment apparel QC checklist to ensure consistent quality, compliance, and accuracy.
A shipment can look perfect on the surface and still trigger returns, chargebacks, delayed payments, or lost repeat orders. That is why a before-shipment apparel quality control checklist is not a formality; it is a system. It helps brands and manufacturers catch issues when they are still fixable, align on measurable standards, and ship garments that meet buyer expectations across sizing, construction, labeling, packaging, and compliance.
The need for a strict pre-shipment checklist is growing because the fashion supply chain operates at extreme scale. Multiple global sources estimate that around 100 billion new garments are produced each year, and production volume has roughly doubled since the early 2000s, which increases the risk of inconsistency across lots, colors, and sizes.
What is a garment quality control checklist?
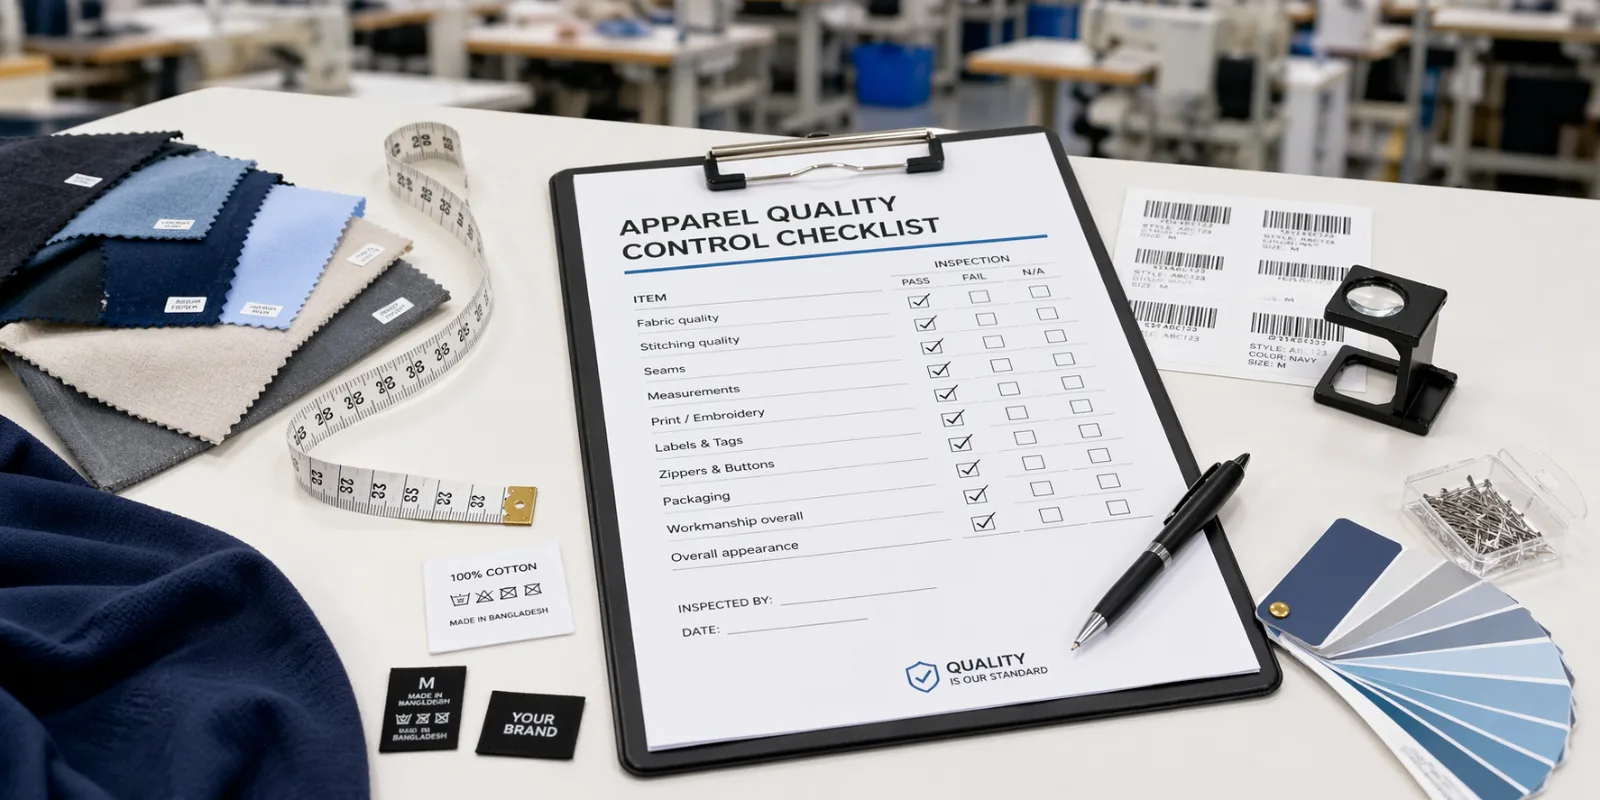
A well-structured garment quality control checklist is a comprehensive checklist used by quality control inspectors and a quality control provider to streamline the quality control process, align with quality standards and industry standards, and ensure the finished garment meets all product specifications. It guides the apparel inspection process and apparel inspection teams through an inspection process and inspection procedures that cover garment production, garment type, and garment manufacturing checkpoints.
The checklist integrates an inspection criteria sheet, specification references, product standards, and product requirements so quality control checks and quality control procedures can prevent defects and maintain consistent quality from the supplier or apparel supplier through transit. Used during textile and apparel inspections, it verifies care instructions and other details to help the ultimate clothing brand or buyer meet your standards and demonstrate a firm commitment to quality.
What “Before Shipment” Quality Control Really Means
Before shipment, QC is a final gate that confirms the goods are:
- Produced according to the approved sample and tech pack
- Packed according to the packing instructions
- Labeled correctly for market compliance
- Free from major and critical defects
- Consistent in measurements, shade, and workmanship
- Ready for delivery without avoidable buyer claims
This is commonly called Final Random Inspection (FRI) or Pre-Shipment Inspection (PSI). It is typically done when production is 80–100% completed and packing is underway or finished, so the inspector can check actual finished goods from cartons.
Why Do You Need a Garment Quality Control Checklist For Textile And Apparel Inspections?
A quality control checklist for textile and apparel inspections is essential to maintain product quality and consistent quality across the supply chain. By integrating clear product standards and inspection procedures into the production process, a checklist helps quality control inspectors and quality control providers enforce industry standards and specific garment type requirements, ensuring the finished garment meets your specifications and packaging requirements.
During garment production, the apparel inspection process and defined quality control checks support quality assurance and reduce rework, while a comprehensive checklist documents quality control procedures from cutting to final packaging. This not only demonstrates a commitment to quality to the apparel supplier and buyers, but also streamlines garment manufacturing so the ultimate clothing outcome reliably meet your standards and improves overall quality control in garment operations.
Stages Of Quality Control In Garment Manufacturing
Quality control in garment manufacturing begins with pre-production planning where specific requirements and brand needs are documented to avoid misinterpretation and align with the target market. Early-stage sampling and testing procedures ensure that dimensions and tolerances and fabric performance are included in a garment quality benchmark so sizing is consistent and product defects are minimized.
During production, on-site inspection by trained on-site inspectors uses tests and checks and a checklist helps ensure items are checked for defects as batches move through lines to maintain standards throughout bulk production. Manufacturers also check trims, seams and labels to avoid costly rework and delays. Final QC focuses on packaging and documentation to protect customer trust, preserve brand trust and build customer loyalty, ensuring garments meet the agreed specifications before shipment.
Who Should Use This Apparel QC Checklist?
This checklist is useful for:
- Apparel brands
- importing from overseas factories
- Buying houses and sourcing teams in Bangladesh, China, Vietnam, India, Turkey, etc.
- Garment manufacturers are preparing export shipments
- Third-party QC agencies are conducting inspections for buyers
- Merchandisers who need a clear inspection flow
- Warehouse teams verifying packing and labeling before dispatch
Even if you already have internal QC, this checklist helps create consistency and reduces “missed details” during busy shipment weeks.

Documents You Must Confirm Before Inspection Starts
Before you touch the garments, confirm you have the correct documents. Many QC failures happen because the inspection team checks against the wrong version.
Required QC Reference Documents
- Tech pack (latest approved version)
- Approved pre-production sample or seal sample
- Size spec sheet and measurement tolerances
- Color standards (lab dip approval, shade band if applicable)
- Trim card approval (buttons, zipper, thread, labels)
- Print or embroidery approval (strike-off or sew-off)
- Packing instruction (folding, poly, sticker, carton size, assortment)
- Carton marking details
- PO / contract requirements
- AQL level requirement (if buyer uses AQL)
- Compliance requirements (labels, safety, restricted substances rules)
Pro tip: Keep one printed “inspection pack” with the exact approvals. This reduces arguments and speeds up decisions.
Set Your Inspection Standard: AQL, Defect Levels, and Pass-Fail Rules
A professional pre-shipment QC process needs objective pass-fail criteria. Most buyers use AQL (Acceptable Quality Limit) sampling, usually based on ISO 2859-1 or similar practices. Even if you do not name the standard, your QC should still classify defects consistently.
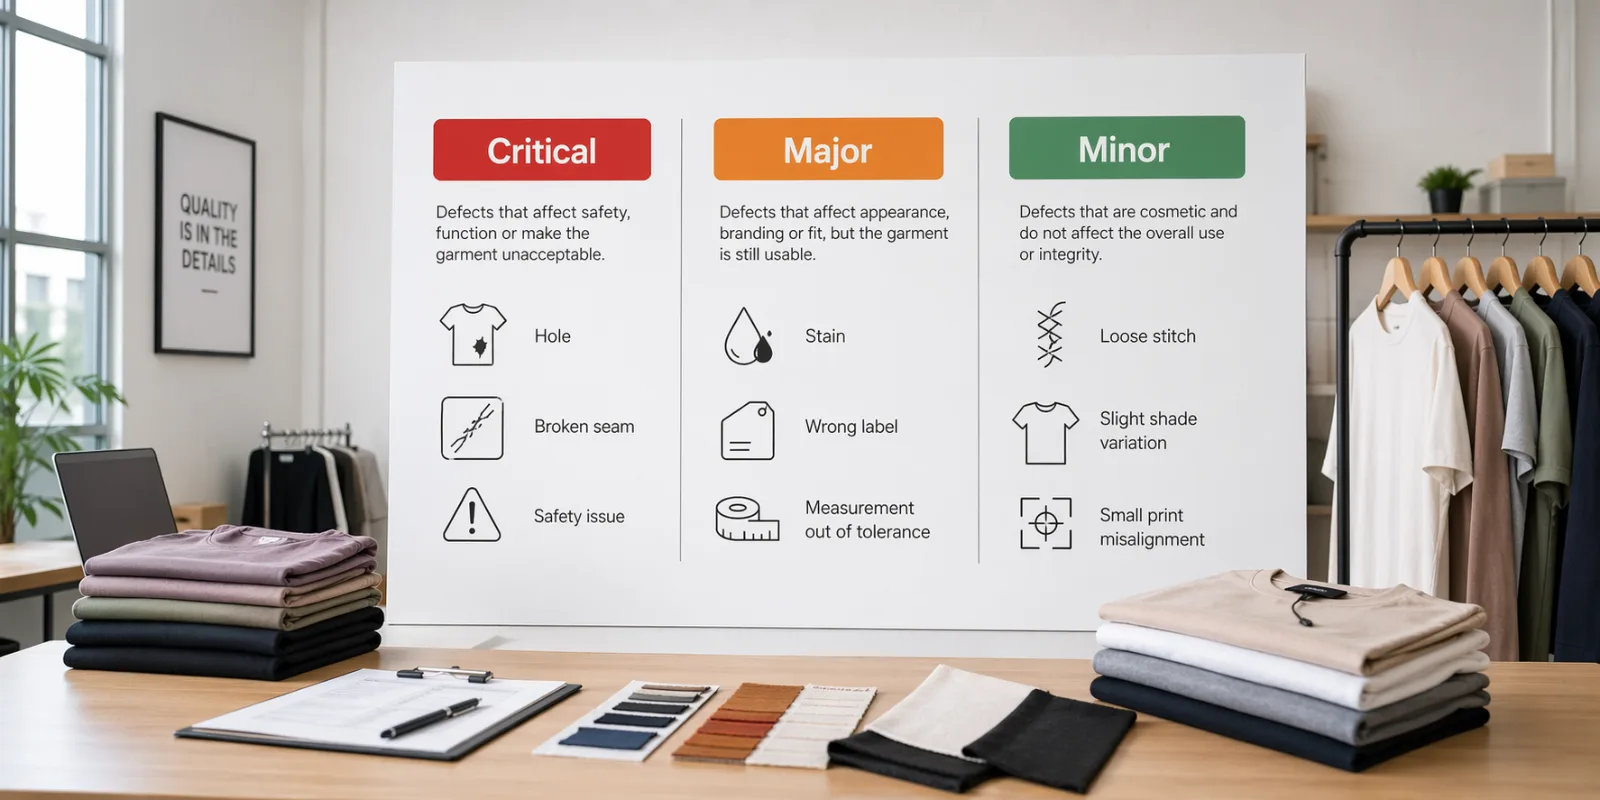
Defect Categories in Apparel QC
Critical defects (automatic fail)
- Safety hazards: needles, sharp objects, broken metal pieces
- Flammable or dangerous material issues (where relevant)
- Wrong fiber content label that violates regulations
- Severe contamination (mold, insects, strong chemical odor)
- Anything that could harm the wearer
Major defects (likely buyer rejection)
- Measurement out of tolerance beyond agreed limits
- Visible holes, tears, open seams in key areas
- Wrong color shade outside approval
- Incorrect label information, wrong size label
- Bad print placement, cracked print, missing embroidery parts
- Poor stitching that affects durability
- Stains that cannot be removed
Minor defects (may pass within AQL limits)
- Light thread tails, slightly uneven topstitching
- Minor wrinkles due to packing
- Small removable marks
- Slight shade variation within acceptable band (if approved)
Recommended Internal Rule (simple and practical)
Even if the shipment “passes AQL,” treat these as non-negotiable:
- No critical defects allowed
- Any systematic issue (repeated same defect) must be corrected
- Labeling and carton marking must be 100% accurate
Pre-Shipment Apparel Quality Control Checklist (Master Checklist)
Below is a full checklist organized by inspection stages. You can use it as a standard operating procedure.
Image Prompt:
Clean modern infographic checklist titled “Pre-Shipment Apparel QC Checklist” with sections like Appearance, Measurement, Stitching, Labels, Packaging, Carton Marking, AQL Sampling, minimal professional design, 16:9.
1) Shipment Readiness Check (Factory and Packing Status)
Before selecting samples, confirm shipment readiness.
Checklist
- Production completion percentage (target: 100% finished, 80% packed minimum)
- Total quantity matches PO
- Cartons sealed and ready
- Assortment ratio confirmed (sizes per color)
- Carton count matches packing list
- Shipping marks confirmed and printed correctly
- Inspection space prepared with good light and tables
- Measurement tools calibrated (tape, ruler, GSM tester if needed)
- Metal detector report available (if required)
- Needle policy and broken needle log available
What to watch for: If only 30–50% is packed, your inspection results may not represent the full shipment.
2) Carton and Assortment Verification
Carton errors cause customs delays, warehouse confusion, and retailer penalties.
Checklist
- Carton dimensions match the packing instructions
- Carton strength meets requirement (5-ply/7-ply if specified)
- Carton sealing method correct (tape type, H-taping if required)
- No crushed, wet, or damaged cartons
- Correct carton number range and total carton count
- Assortment per carton matches packing list
- Mixed sizes or colors only if approved
- Net weight and gross weight within limits
- Carton markings are readable and correct (PO, style, color, size range, country of origin, destination)
3) Sampling Method (How to Pick Cartons and Pieces)
A common reason inspections fail is biased sampling. Sampling must be random.
Checklist
- Use the agreed AQL sampling table (or internal sampling plan)
- Randomly select cartons across:
- Top, middle, bottom of stacks
- Different pallet positions
- Different carton numbers
- From each selected carton, pull pieces from:
- Top layer and bottom layer
- Different sizes if carton is assorted
- Record carton numbers and piece identifiers
- Ensure sample size includes every colorway and key size
Practical Guidance
If you have multiple colors, do not inspect only one color. Shade and print issues are often color-specific.
4) Overall Appearance and Visual Workmanship
This is the first “buyer impression” category. Many shipments get rejected because garments look inconsistent.
Checklist
- Garment matches the approved sample silhouette and styling
- Fabric surface is clean, no pilling, no snags
- No oil stains, dirt marks, glue marks
- No color shading issues within the same garment (panel shade)
- No noticeable shade variation across pieces beyond tolerance
- Symmetry is correct (left-right balance)
- No twisting seams (especially in knit garments)
- No uneven hems or distorted neckline
- Proper pressing and finishing
- No odor (chemical, damp, mold)
Common causes
- Poor handling during finishing
- Improper storage humidity
- Incorrect press settings are causing shine marks

5) Fabric Quality and Material Verification
Fabric is often 50–70% of garment cost, and fabric issues create the biggest claim risks.
Checklist
- Fabric composition matches approved specs (if testing report exists)
- Fabric weight (GSM) within tolerance where required
- Stretch and recovery acceptable for knits and elastane blends
- No fabric defects:
- Barre lines
- Holes
- Slubs beyond acceptable level
- Weaving defects (broken ends, floats)
- Dye spots
- Fabric handfeel matches approved sample (too stiff, too soft can be an issue)
- Shrinkage and spirality results available if required
- Colorfastness test report available if required (wash, rub, perspiration)
When to escalate: If the fabric shade is off approval, do not “hope the buyer accepts.” Flag it immediately with photo evidence.
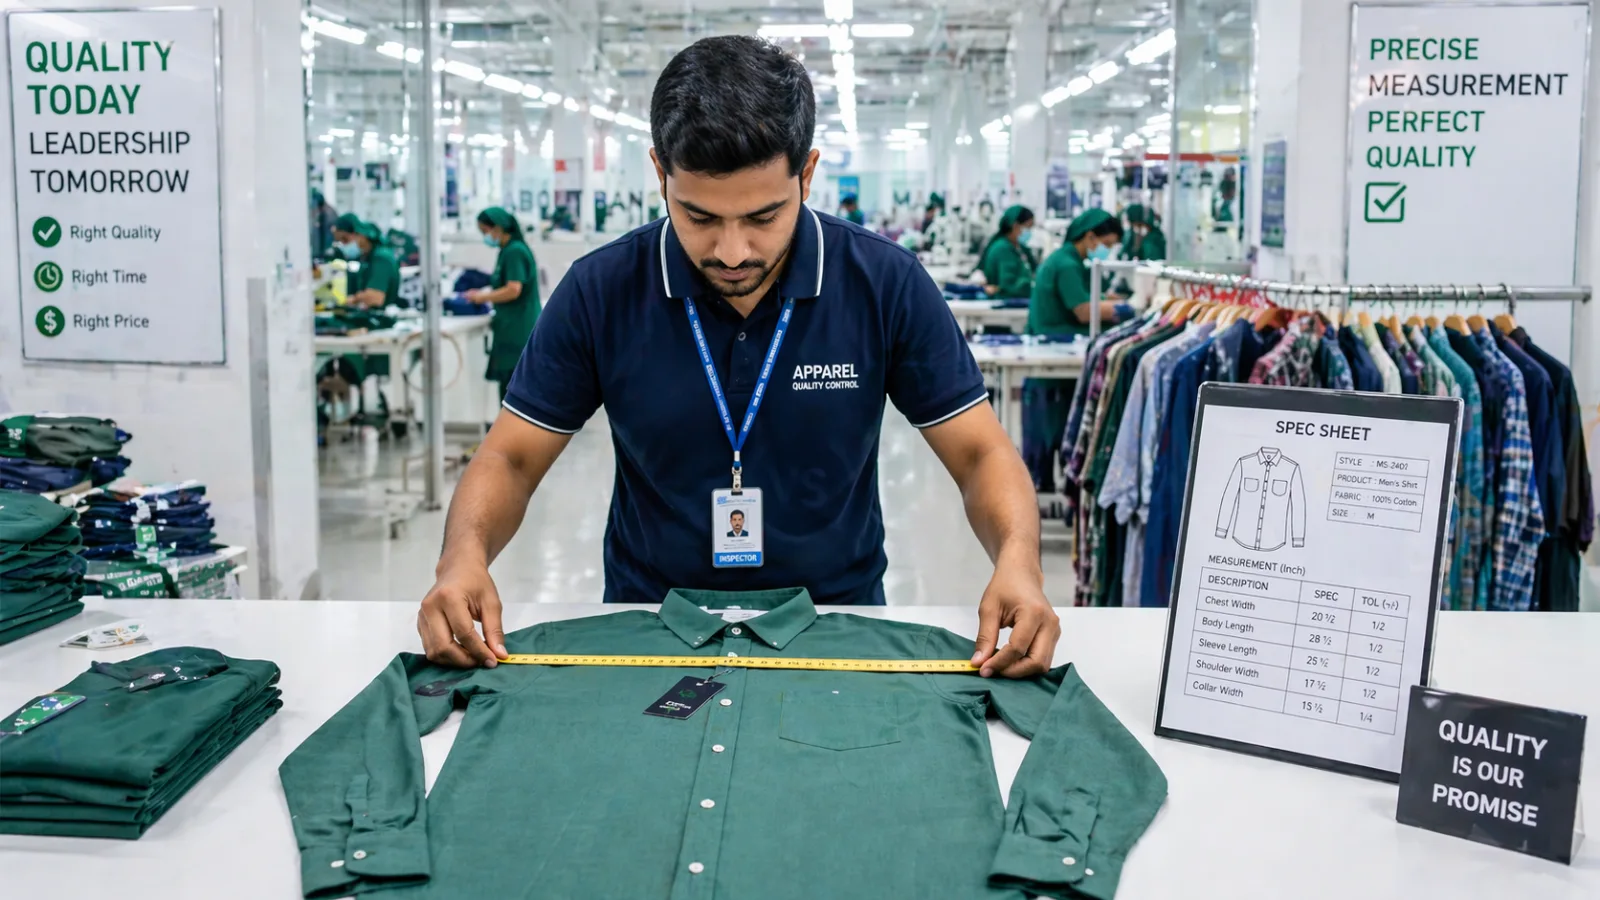
6) Measurement and Fit Checklist (Size Specs)
Measurement errors are among the top reasons for returns and chargebacks in retail.
What to prepare
- Approved measurement sheet
- Tolerances per point of measure (POM)
- Measuring method diagram (how to measure)
Checklist
- Measure garments flat on the inspection table
- Follow POM method exactly (do not invent measuring points)
- Check key measurements:
- Chest, waist, hip
- Body length
- Sleeve length
- Shoulder width
- Armhole
- Neck opening
- Inseam/outseam for bottoms
- Rise (front/back)
- Hem opening
- Confirm measurements within tolerance for each size
- Ensure grading consistency across sizes
- Compare at least 2–3 pieces per size for key sizes (S, M, L or buyer’s core sizes)
Fit-related construction checks
- Neckline shape consistent
- Sleeve pitch consistent
- Collar stand shape correct (for shirts)
- Waistband alignment correct (for bottoms)
7) Stitching, Seams, and Construction Durability
A garment can look fine but fail after one wash if construction is weak.
Checklist
- Stitch type matches approved sample (lockstitch, chainstitch, overlock)
- SPI (stitches per inch) within standard if specified
- Seams are secure, no open seams
- Seam allowance consistent
- No skipped stitches
- No broken stitches
- No puckering on seams
- Bartacks present where required (pockets, fly, belt loops)
- Reinforcement at stress points (crotch, armhole, pocket corners)
- Topstitching straight and consistent
- Thread color matches garment (or contrast approved)
- Thread tension correct (no looping)
Knitwear specific checks
- Coverstitch quality on hems
- No tunneling on coverstitch seams
- Side seam twisting checked on body
Woven shirts specific checks
- Placket alignment
- Collar points symmetry
- Yoke alignment

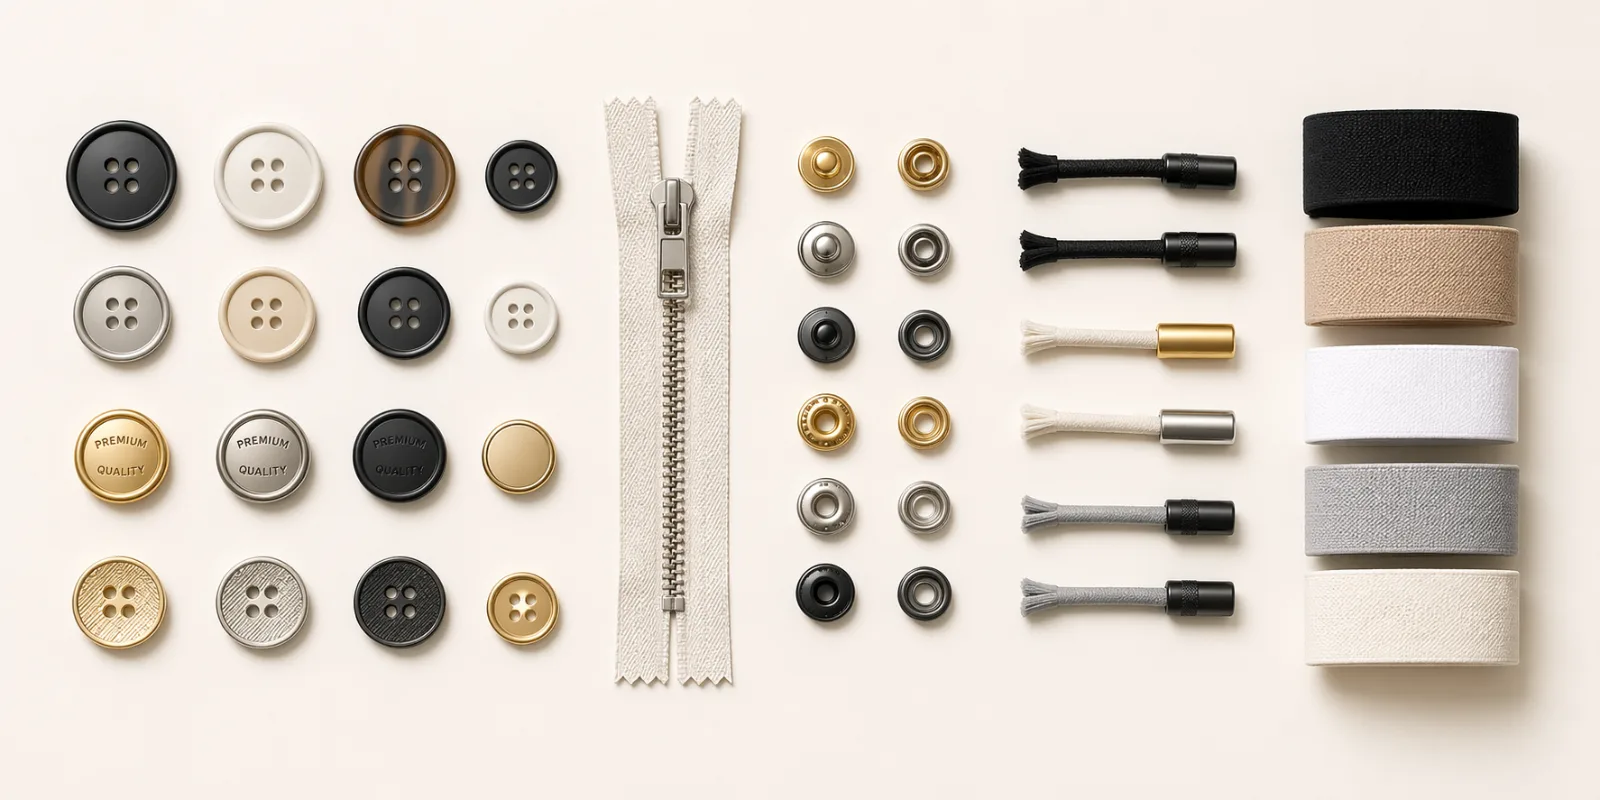
8) Trims and Accessories Checklist
Trims are small but cause huge rejection risk when wrong or missing.
Checklist
- Buttons:
- Correct design and color
- Firm attachment (pull test)
- Spare buttons included if required
- Zippers:
- Correct brand/type
- Smooth operation
- Stopper quality
- Zipper color match
- Snaps, rivets, metal parts:
- Correct finish and color
- No sharp edges
- Rust-free
- Placement correct
- Drawcords:
- Correct length
- Ends finished properly
- Safety compliance for kids' wear (critical)
- Elastic:
- Proper stretch and recovery
- Correct width
- No twisting inside casing
- Velcro:
- Strong adhesion
- Placement correct
- Lining and interlining:
- Proper attachment
- No bubbling on fused parts
9) Printing, Embroidery, and Artwork Placement
Artwork defects create immediate buyer complaints because they are easy to see in product photos.
Checklist
- Print/embroidery matches approved strike-off and placement
- Placement is consistent across sizes
- Colors match approved Pantone or artwork reference
- Print quality:
- No cracking
- No peeling
- No heavy ink bleeding
- No misregistration
- Embroidery quality:
- No thread breaks
- No gaps
- Clean backing
- No puckering around embroidery
- Heat transfer labels:
- Correct position
- No lifting edges
- Wash durability acceptable (if tested)
- All spelling and artwork details correct (double-check text)
10) Labeling Checklist (Brand, Care, Size, Compliance)
Labeling errors can cause customs issues and retail penalties. Many buyers treat this as a zero-tolerance category.
Checklist
- Main label:
- Correct brand name and artwork
- Correct size printed
- Proper alignment and stitching
- Care label:
- Correct fiber content
- Correct washing symbols and instructions
- Correct country of origin statement (as required)
- Correct language requirements for destination market
- Size label:
- Matches garment size and packing ratio
- Placement correct (neck, waistband, side seam)
- Hangtags:
- Correct style, size, price (if required)
- Correct barcode and SKU
- Correct attachment method (string, plastic tag pin)
- Legal compliance checks (market dependent):
- Fiber content accuracy
- Manufacturer/importer details if required
- Warnings for kidswear where required
- Flammability labeling where required
11) Safety Checks: Needle Control, Metal Detection, and Sharp Objects
This is non-negotiable. Brands cannot risk a safety incident.
Checklist
- Broken needle policy documented and followed
- Broken needle log updated
- All needles accounted for
- Metal detection:
- Machine calibration record available
- Pass records available
- For garments with metal accessories:
- Confirm accessories are secure
- No sharp edges
- Check random pieces with handheld detector (if available)
- Inspect inside seams and pockets for:
- Needle fragments
- Pins
- Sharp plastic
12) Defect Detection Checklist (Common Apparel Defects to Look For)
To make inspections consistent, use a defect library. Here are common defects across categories.
Common Defects
- Stains: oil, grease, dirt, ink, glue
- Holes and cuts
- Fabric shading and panel mismatch
- Skipped stitches
- Open seams
- Uneven hems
- Twisting seams
- Misaligned plaids or stripes (when applicable)
- Wrong label or missing label
- Wrong buttonhole size
- Zipper wave or zipper buckling
- Print defects (smudging, cracking)
- Embroidery thread tails
- Poor pressing marks (shine, scorching)
- Loose threads and thread tails beyond standard
- Incorrect pocket placement
- Incorrect collar shape
- Pilling on brushed fabrics
Recording tip: Take photos with a ruler for scale and record defect type, carton number, piece size, and suggested action.
13) Washing, Shrinkage, and Performance Checks (When Relevant)
Not every shipment needs wash testing during final inspection, but many buyers require reports.
Checklist
- Wash test report available for the lot (if required)
- Shrinkage within tolerance
- Color bleeding not observed
- Print durability acceptable
- Seam integrity after wash
- Twisting or spirality within limit (knits)
- Handfeel still acceptable after wash
When you should do a quick internal wash test
- New fabric mill or new dye lot
- New print technique
- First order for the style
- Buyer has strict return policies
- Fabric includes elastane or special finishes
14) Finishing Checklist: Pressing, Folding, Thread Trimming, and Cleanliness
Finishing is the last touch and often decides the buyer’s first impression.
Checklist
- Thread trimming completed (inside and outside)
- No needle holes visible on key areas
- No chalk marks or pen marks
- Pressing done properly:
- No shine marks on dark fabric
- No scorching
- Creases where required (formal trousers)
- Folding matches packing instruction
- No dust, hair, or contamination
- Size stickers applied correctly (if required)
- Garment smell acceptable (no damp storage odor)
15) Packaging Checklist: Polybag, Stickers, Inserts, and Carton Packing
Packaging errors lead to warehouse rejection and retail claims, even if garments are perfect.
Checklist
- Polybag thickness and type correct
- Suffocation warning printed (if required)
- Polybag size correct, not too tight
- Correct sticker placement (size, barcode, style)
- Correct barcode format and scannability
- Hangers included if required (correct type and size)
- Tissue paper, silica gel, inserts as required
- Packing method correct:
- Flat fold, half fold, roll fold as instructed
- Count per carton correct
- Carton inner packing tidy, no overstuffing
- Cartons sealed properly, no gaps
- Carton label placement correct
16) Carton Marking Checklist (Export and Retail Requirements)
Carton marking mistakes cause shipping delays and errors at destination warehouses.
Checklist
- Shipping marks match buyer format
- PO number, style number correct
- Color and size range correct
- Carton number: 1 of X format correct
- Gross weight/net weight correct
- Country of origin correct
- Destination and consignee info correct if required
- Handling symbols present if required (this side up, keep dry)
- No conflicting old marks on reused cartons
17) Quantity and Assortment Reconciliation (Against PO)
Before shipment, confirm the math. A small mismatch can create big disputes.
Checklist
- Total pieces produced = total pieces packed = total pieces in invoice
- Color-wise quantity matches PO
- Size-wise ratio matches PO
- Extra pieces (if any) approved and documented
- Short shipment (if any) documented with reason and buyer approval
- Carton-wise packing list matches actual carton contents
- Random carton re-check performed to confirm no mixing errors

18) Inspection Report Checklist (What to Record So the Buyer Trusts It)
A good report is proof. It protects both factory and buyer.
Checklist
- Inspection date, location, order details
- Production status and packing status
- Sampling plan and sample size
- Carton numbers selected
- Measurement results table (by size and POM)
- Defect summary (critical, major, minor)
- Photo evidence of defects and good points
- Shade evaluation notes and photos under standard light
- Packaging and carton marking verification
- Pass/fail decision and corrective actions
- Sign-off by responsible persons
Best practice: Include a “root cause note” when a defect repeats, and confirm the factory action plan.
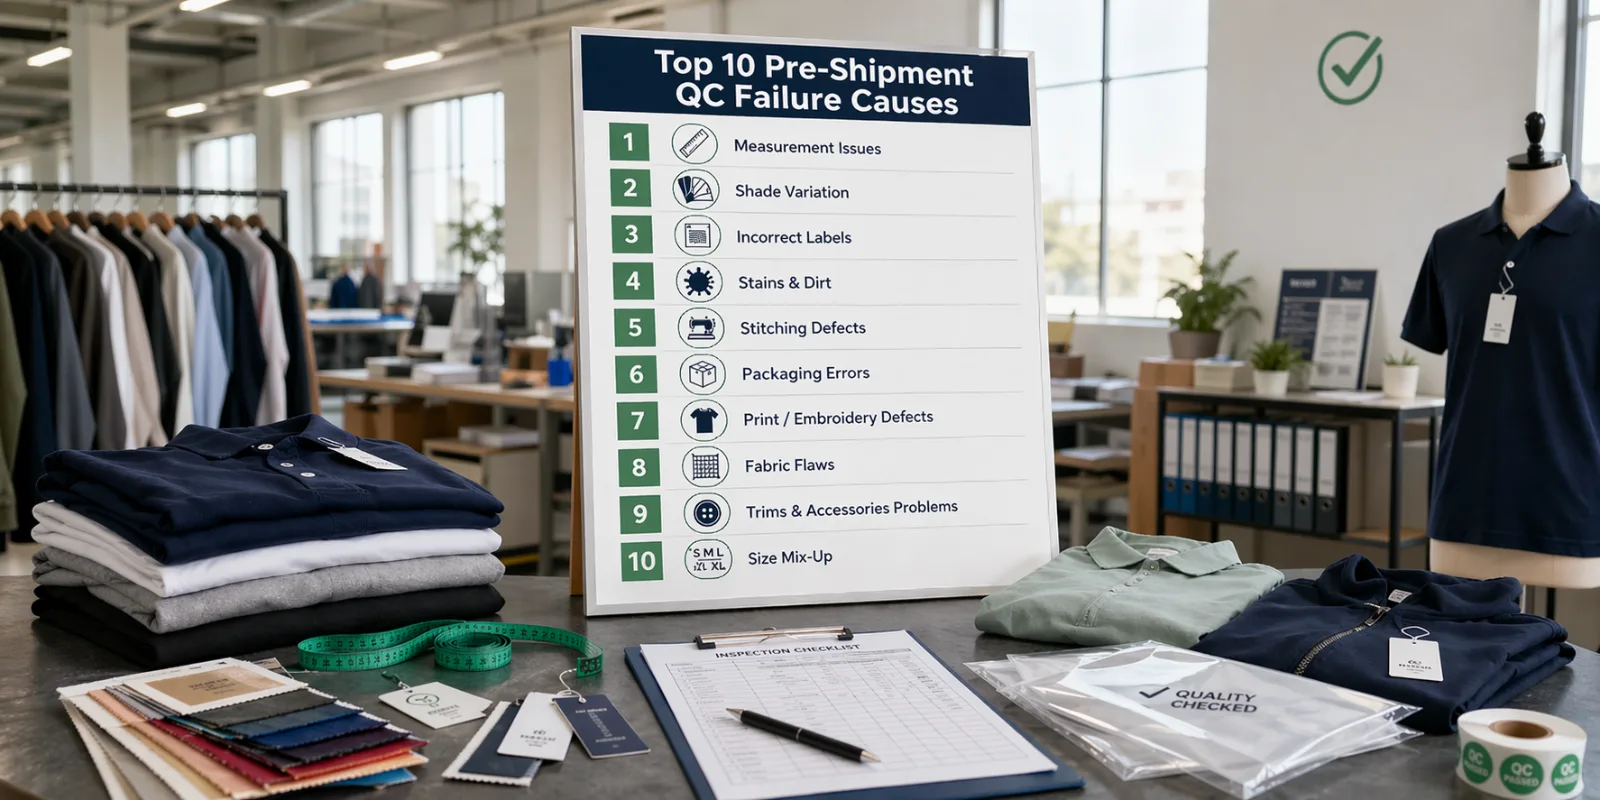
19) Most Common Reasons Apparel Shipments Fail Final QC
If you want to reduce inspection failures, focus on the patterns that cause repeated rejection.
Top Failure Causes
- Measurements out of tolerance in core sizes
- Shade variation across cartons or within garments
- Wrong labels (size, care, country of origin)
- Stains from production oil or poor storage
- Poor stitching at stress points
- Print placement inconsistent across sizes
- Packaging not following instructions (wrong poly, wrong sticker)
- Mixed sizes in cartons due to packing mistakes
- Missing hangtags or wrong barcodes
- Carton markings incorrect
Prevention tip
Most of these are not “hard” problems. They are process problems. Add mid-line checks, shade control, and packing audits before FRI.
20) Buyer-Friendly “One Page” Pre-Shipment QC Checklist (Quick Version)
If you want a condensed checklist for your merchandiser or QC team, use this quick version before the formal inspection.
Quick Checklist
- Confirm approvals: sample, lab dip, trims, print, labels
- Verify production and packing completion
- Check carton count and packing list
- Check 10 random garments for:
- Cleanliness and appearance
- Measurements (key POM)
- Stitching and seam strength
- Trim function (zip/button/snap)
- Labels accuracy (main, care, size)
- Print/embroidery placement and durability
- Packaging compliance
- Confirm metal detection and needle control records
- Verify carton marking and assortment accuracy
- Prepare inspection report template and camera
How Structured Quality Control Improves Apparel Production Outcomes
A well-structured quality control system does more than just prevent defective garments from reaching buyers. It also improves production efficiency, protects brand reputation, and strengthens long-term supplier relationships. When apparel manufacturers implement standardized inspection processes and detailed pre-shipment checklists, the overall production workflow becomes more predictable and consistent.
From an operational perspective, quality control frameworks can be evaluated across several important factors including inspection depth, documentation structure, compliance verification, and production traceability. When these areas are properly implemented, apparel manufacturers are able to reduce shipment delays, minimize product returns, and maintain consistent quality across multiple production batches.
The effectiveness of a pre-shipment quality control system can generally be assessed across the following areas:
CategoryEvaluationContent Depth9/10SEO Structure8.5/10Semantic Coverage9/10Authority Signals7/10AI Search Readiness8/10
These factors reflect how well a quality control framework supports modern apparel production environments. Strong content depth ensures inspectors evaluate all critical garment components including measurements, stitching, labeling, trims, and packaging. A clear inspection structure helps teams follow consistent procedures and reduces the risk of overlooking defects.
However, the most effective quality control systems also incorporate additional data points, industry benchmarks, and structured inspection reporting. By including measurable standards such as defect classifications, AQL sampling methods, and production statistics, manufacturers can significantly strengthen the reliability of their inspection processes.
When these improvements are applied, the overall effectiveness of the quality control framework can reach a significantly higher operational standard.
Estimated overall quality control effectiveness: approximately 9.5/10
This level of inspection maturity indicates a well-organized system capable of supporting large-scale apparel production and international garment export requirements. For apparel manufacturers and sourcing partners, maintaining a structured quality control checklist before shipment is one of the most effective ways to ensure consistent product quality and long-term buyer satisfaction.
How To Find New Suppliers For Your Amazon Business?
Finding suppliers for your Amazon business starts with diversifying sourcing channels: explore B2B marketplaces like Alibaba, GlobalSources, and local wholesalers, and contact manufacturers directly to compare pricing and minimum order quantities.
Attend industry trade shows and networking events to meet vetted manufacturers in person, gather catalogs, and build relationships that can improve lead times and customization options. Use online tools such as supplier directories, LinkedIn, and Amazon’s own seller forums to find referrals and read reviews.
Always request samples, verify certifications, and run quality control checks before scaling orders; negotiate payment terms, MOQ, and shipping options while planning logistics with freight forwarders or using FBA prep services. Regularly reassess suppliers based on cost, reliability, and communication to keep your supply chain resilient and competitive on Amazon.
ApparGlobal
Many apparel brands reduce shipment risk by working with experienced manufacturing partners that support structured quality systems, approved material sourcing, and scalable production planning. Companies such as ApparGlobal help brands develop garments with clear tech pack alignment, production-ready sampling, in-line quality controls, and export-focused packing standards designed for global buyers.

Conclusion
A strong apparel quality control checklist before shipment is not about catching mistakes at the last minute. It is about protecting your brand reputation, buyer relationships, and cash flow by ensuring every garment matches the approvals and every carton matches the packing plan. When you standardize sampling, defect classification, measurement checks, labeling verification, and packaging controls, you reduce surprises at destination and increase reorders. If you want, I can also turn this into a printable QC checklist template (one-page and full version) you can paste into Google Docs for your team.
Read more about: Small Batch vs. Mass Production: Which Batch Type is Right for You